Using the Python API for USRP SDR devices.
 USRP
USRP
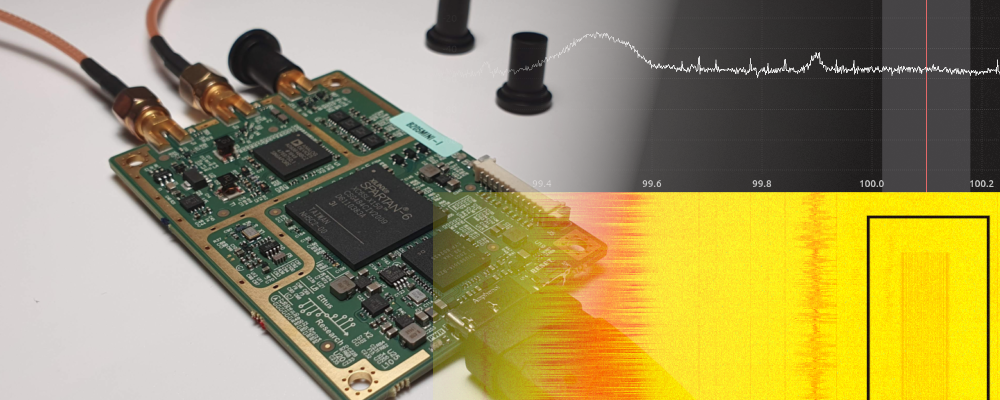
On my job, I use python almost every day to develop auxiliary scripts for executing tests, automate some CICD flows or control equipment to emulate hardware. I have to say that I am very comfortable with Python because, for my use level, the language is very simple and almost all the functions I need have a library already developed. In this blog, I have shown you in articles like this how I use Python as an orchestrator to execute tests. That Python is widely used in industry is something that not only we know, but device manufacturers also know, and they try to design its devices Python-friendly. many of the devices I use regularly have their driver to be managed using a Python script, and SDR devices are not an exception. Devices like the famous RTL-SDR have their driver, or API, for Python, in this case, the pyrtlsdr package. In this blog, we already talk about SDR and the devices from Ettus Research, I have used in some articles my USRP B205mini-i and my USRP B210 and obviously, they are not an exception to the Python fever. In this article, we are going to talk about UHD, the Python API to manage these devices and we will develop a simple example.
First of all, we need to install many dependencies that the API needs. All of them are included in the next snippet.
pablo@friday:~$ sudo apt-get install autoconf automake build-essential ccache cmake cpufrequtils doxygen ethtool g++ git inetutils-tools libboost-all-dev libncurses5 libncurses5-dev libusb-1.0-0 libusb-1.0-0-dev libusb-dev python3-dev python3-mako python3-numpy python3-requests python3-scipy python3-setuptools python3-ruamel.yaml
Then, once we have our computer ready, we can clone the UHD repository from the Ettus Research Github.
pablo@friday:~$ git clone [email protected]:EttusResearch/uhd.git
Once we have cloned the repository, my recommendation is to execute a checkout to the last release, Now, the last release is corresponding with the tag v4.3.0.0.
pablo@friday:~$ cd uhd
pablo@friday:~/uhd$ git v4.3.0.0
Now we can be sure that we are not using code whose development is still ongoing. Then, we have to install the UHD driver. At this point, we can follow the instructions found on the Ettus research page, but, in my case, and as well some users that I found, those instructions do not work to install the Python API. I have followed the instruction from PySDR, which worked with some issues.
pablo@friday:~/uhd$ cd host
pablo@friday:~/uhd/host$ mkdir build
pablo@friday:~/uhd/host$ cd build
pablo@friday:~/uhd/host/build$ cmake -DENABLE_PYTHON_API=ON ../
pablo@friday:~/uhd/host/build$ make
pablo@friday:~/uhd/host/build$ sudo make install
Once the driver is installed, we have to grant access to the USB ports to the UHD driver. To do that, in the driver folder, we can find the file uhd-usrp.rules, which has to be copied to /etc/udev/rules.d/ . Then we have to reload them.
pablo@friday:~/usr/local/lib/uhd$ sudo cp uhd-usrp.rules /etc/udev/rules.d/
pablo@friday:~/usr/local/lib/uhd$ sudo udevadm control –reload-rules
pablo@friday:~/usr/local/lib/uhd$ sudo udevadm trigger
At this point we have the driver installed. We can now connect the UHD device, and make a test using the command uhd_find_devices.
pablo@friday:~$ uhd_find_devices
[INFO] [UHD] linux; GNU C++ version 11.3.0; Boost_107400; UHD_4.3.0.0-0-unknown
[INFO] [B200] Loading firmware image: /usr/local/share/uhd/images/usrp_b200_fw.hex...
--------------------------------------------------
-- UHD Device 0
--------------------------------------------------
Device Address:
    serial: 31DDAAD
    name: B205i
    product: B205mini
    type: b200
In my case, after following all the steps, when I tried to import the uhd library into a Python script, the module was not found. I repeat all the steps again, and I notice that the output of the cmake command, when the Python libraries are copied to the Python packages folder, the path had twice the folder /local.
-- Up-to-date: /usr/local/local/lib/python3.10/dist-packages/uhd
The correct path was /usr/local/lib/python3.10/dist-packages/uhd, but the installation script copied the library to /usr/local/local/lib/python3.10/dist-packages/uhd. So, I move the uhd/ folder one level above, and then I was finally able to import the uhd package in my python script.
Now, let’s test the API.
The available commands in the Python API are the same as the commands we can find in the C++ API, so can use the documentation of the C++ API.
For the Python script, first, we have to import all the required packages for our application. As an example, I have developed a simple receiver for the band of 1090 Mhz. This band is used for aircraft to send their position, altitude, flight number… and it is sent without any kind of encryption or complex modulation. For this example, we have to use the uhd package, to communicate with the USRP device, pyplot to plot the received signals, and numpy to perform some operations.
import uhd
import matplotlib.pyplot as plt
import numpy as np
Next, we have to establish communication with the USRP device. In this case, I am using a B205mini-i device from Ettus Research.
# detect device
device = uhd.usrp.MultiUSRP()

    [INFO] [UHD] linux; GNU C++ version 11.3.0; Boost_107400; UHD_
    [INFO] [B200] Loading firmware image: /usr/local/share/uhd/images/usrp_b200_fw.hex...
    [INFO] [B200] Detected Device: B205mini
    [INFO] [B200] Loading FPGA image: /usr/local/share/uhd/images/usrp_b205mini_fpga.bin...
    [INFO] [B200] Operating over USB 2.
    [INFO] [B200] Initialize CODEC control...
    [INFO] [B200] Initialize Radio control...
    [INFO] [B200] Performing register loopback test...
    [INFO] [B200] Register loopback test passed
    [INFO] [B200] Setting master clock rate selection to 'automatic'.
    [INFO] [B200] Asking for clock rate 16.000000 MHz...
    [INFO] [B200] Actually got clock rate 16.000000 MHz.
When we execute this command, the connection will be established, and the FPGA of the USRp device will be configured. In my case, using Python 3.10, this step is turned too slow, spending a couple of minutes to be completed. For older versions of Python, 3.7 or 3.8, this step is much faster.
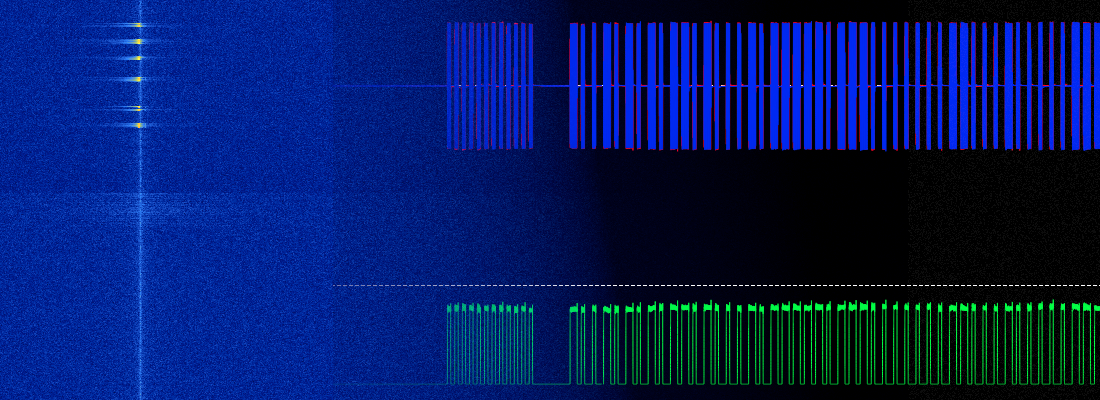
At this point, we have the device ready to capture signals, so we have to make some calculations to configure the receiver and the amount of time we need to capture. The ADS-b signals are sent using a baud rate of 1 mega sample per second, so the acquisition frequency will be at least 2 Msps. Since the device can receive up to 20 Msps, I have configured the sample rate to 10 Msps. This way we will have 10 points per bit, in other words, we are using an oversampling factor of 10. The center frequency of the receiver have to be configured at 1090 Mhz, which is the band where the signal is transmitted. Finally, the gain of the receiver is set to 50 dB, which is a value with which I had good results.
Another value we will need is the number of samples we want to receive. This value can be calculated with the baud rate and the amount of time we are going to receive.
# Configure capture
t = 3.0
fadq = 10e6
fcenter = 1090e6
gain = 50

nsamples = int(t*fadq)

tVector = np.linspace(0,t,nsamples)
Once the capture is configured, we are going to perform the first capture. We are going to use the function recv_num_samps. To this function we have to pass all the values configured before, and the output of this function will be a 3d list with the complex value of the data received. We can plot the data using the plot command and plotting the first row. For this kind of signals, I prefer to plot the power of the signal, since it allows us to detect clearly when the signal is present or not.
samples = usrp.recv_num_samps(nsamples, fcenter, fadq, [0], gain)
plt.plot(tVector, (np.abs(samples[0]))**2)
For the first capture, no ADS-B frame is received, but this capture will help us to determine the noise floor. We can see that the peak of the noise received is around 0.00013, so we can establish that signals above this level is a received data.

In a second capture, I received several frames from an aircraft (or airport, since they can send requests for the aircraft), and we can see that using the power instead of the amplitude, the difference between data received and noise can be distinguished.

Now, once we know that we can receive data, we can digitize the data using a threshold. the level of this threshold will be configured according to the noise level. I have configured a threshold of 0.004.
threshold = 0.004;
# Decode ADS-B frame
adsbDataRate = 1e6;
oversamplingFactor = fadq/adsbDataRate
bitMid = oversamplingFactor/2

# Convert samples to power
samplesPow = np.abs(samples[0])**2

binaryFrame = []

# convert data to digital frame
for data in samplesPow:
    if data > threshold:
        binaryFrame.append(1)
    else:
        binaryFrame.append(0)

By zooming in on a received frame, we can see all the bits of the ADS-B frame.
plt.plot(tVector, binaryFrame)
#plt.xlim([0.86910, 0.86923])
plt.grid()
plt.xlabel('Time')
plt.ylabel('Data')

At this point, we can use the package PyModeS to decode the frame, and this is the best of using Python APIs, we have a huge number of packages to make almost all we can imagine. This is not only valid for SDR or USRP devices, nowadays, if any kind of instrumentation does have not a Python API or C/C++ API, and there is a reason for that, if I can not configure the device from Python or C, it will be difficult to automatize tasks using it. In a nutshell, using the Python API to control the USRP devices makes them very easy to use since learning a few commands to read or send signals, the rest is made by very known packages like numpy of scipy.