Creating Pynq images for custom boards.
In this blog we already talk about Pynq and how it can help us to develop some applications in a easy way. Obviously, Pynq has its limitations but it is still a powerful tool with which we can develop projects in a few minutes. Pynq is Jupyter-notebook based, and includes the corresponding libraries to communicate our Python notebook with the PS and their AXI4 interfaces. That mix between a SoC and Python can be an excellent DSP tool, since Python has many DSP libraries like the Signal package of Scipy, but it is not capable to execute algorithms in real-time. on the other side, computing the constants inside the FPGA can be very tedious, but the FPGA is perfect to execute algorithms in real-time, so the mix of both will be capable of computing the constants of the algorithm and also executing it in real-time.
Unfortunately, Pynq images are only available for a few boards. In this blog, we used Pynq with the Ultra96 of Avnet, and the Pynq-Z2 of TUL, but neither of these boards is designed or has interfaces for signal processing. Luckily, Pynq is based on Petalinux, so it is possible to compile a Pynq image for any board based on Zynq. In this post, we will create a Pynq Image for Digilent’s Eclypse Z7, that with its SYZYGY interfaces is an excellent choice for DSP.
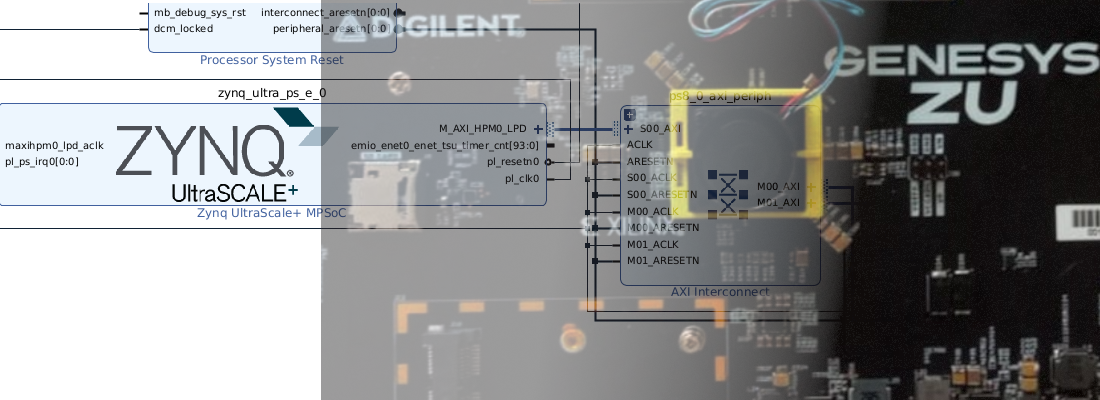
First of all, we need to create a hardware definition for our Petalinux distribution. This hardware definition is only for the startup of Petalinux, because later, when we will need to add new IPs or peripherals we will reload the hardware design, in Pynq words, we can change the overlay, inside the Pynq environment. For the Eclypse Z7 board, we will define only the Zynq processing system and the IP for the management of the IOs through an AXI GPIO IP. The block design will show like the next.

In this blog, we already talk about Pynq and how it can help us to develop some applications in a easy way. Obviously, Pynq has its limitations but it still is a powerful tool with which we can develop projects in a few minutes. Pynq is Jupyter-notebook based, and includes the corresponding libraries to communicate our Python notebook with the PS and their AXI4 interfaces. That mix between an SoC and Python can be an excellent DSP tool since Python has many DSP libraries like the Signal package of Scipy, but it is not capable to execute algorithms in real-time. on the other side, computing the constants inside the FPGA can be very tedious, but the FPGA is perfect to execute algorithms in real-time, so the mix of both will be capable of computing the constants of the algorithm and also executing it in real-time.
~/git/PYNQ$ git checkout v2.5.1
Once we are in the correct tag of Pynq, we need to install and configure our host machine to build a Pynq Image. Since this step will install in our system different packages only used for Pynq built, I recommend you work from a virtual machine. To run this step, we have to execute the script setup_host.sh which is located in /sdbuild` folder.
~/git/PYNQ/sdbuild/scripts$ source setup_host.sh
Now, we can start the process. First of all, inside the Pynq folder, in the board’s folder, we need to create a new board. For this project, I will create the folder Eclypse-z7. Inside this folder, we have to create the .spec file where we will configure the architecture and the packages we will add to the distribution. Also, we can add the BSP file if we have it. In this case, I don’t have a BSP for the Eclypse Z7 board, so I will add the .hdf file to the folder, and the BSP line will remain empty.
ARCH_eclypse-z7 := arm
BSP_eclypse-z7 :=

STAGE4_PACKAGES_eclypse-z7 := pynq ethernet
The .hdf file has to be added to petalinux_bsp/hardware_project folder. The directory tree will look like the next.
~/git/PYNQ$ tree -L 3 ./boards/eclypse-z7/
./boards/eclypse-z7/
├── eclypse-z7.spec
└── petalinux_bsp
    └── hardware_project
        └── eclypse_base_bd_wrapper.hdf
To run the Pynq image built, we have to add to the PATH all the tools that Pynq we will need to create the image. I have created the prebuild.sh file that I have to run before the Pynq is built. That file contains the next commands.
export PATH="/opt/crosstool-ng/bin:/opt/qemu/bin:$PATH"
source /tools/Xilinx/Vivado/2019.1/settings64.sh
source /tools/Xilinx/SDK/2019.1/settings64.sh
source ~/petalinux/settings.sh
petalinux-util --webtalk off
When prebuild.sh is executed, the output will be the next.
~/git/PYNQ$ source prebuild.sh
PetaLinux environment set to '/home/pablo/petalinux'
WARNING: /bin/sh is not bash!
bash is PetaLinux recommended shell. Please set your default shell to bash.
INFO: Checking free disk space
INFO: Checking installed tools
INFO: Checking installed development libraries
INFO: Checking network and other services
WARNING: No tftp server found - please refer to "PetaLinux SDK Installation Guide" for its impact and solution
INFO: Turn off webtalk feature!
Finally, we can execute the make for the corresponding board, and wait a couple of hours to the image has been created.
~/git/PYNQ/sdbuild$ make BOARD=eclypse-z7
Once the process has finished, in the output folder will be available the new Pynq image for the Eclypse Z7 board.
In this post, I have used Digilent’s Eclypse Z7 board, but the process is the same for any board based on Xilinx Zynq7000 or Zynq MPSOC, so you can try to generate your Pynq image.