Remote debugging via hardware server.
In my daily life, as with other FPGA developers, I have a laptop where I write the code, and I connect to a remote host to synthesize and implement the FPGA designs. This offers me many advantages. The most important one is that I don’t need a very powerful processor or a large amount of RAM, since it is only used for documenting and writing the code, and it is easy for me to carry it in my backpack. On the other hand, I have access to a workstation with a powerful processor, and a considerable amount of RAM that allows several implementations simultaneously. If I need to debug the design, the boards for testing are connected via JTAG to the workstation, so if I need to debug the design using ILA or VIO cores I don’t want to go to the workstation room, I need to be able to debug the design from my laptop, and this is exactly what we will do in this post using the remote hardware server.
For this example, all the code I will write is valid for a Linux remote host. First we need to prepare our remote host to be able to connect to the JTAG and the FPGA. For this, we need to install on the remote host the Xilinx hardware server. This software could be downloaded as a standalone file in previous versions of Vivado, now it is included in the Vivado installation file, and also in the Vivado Lab installation file. To enable local debugging in the future, instead of installing only the hardware server, I will install the entire Vivado Lab software. First we have to download from the Xilinx download web page the corresponding version of Vivado Lab Solutions. Then, via sftp or scp we will copy the tar.gz file to the remote PC. Now we can unzip the file.
tar -xf Xilinx_Vivado_Lab_Lin_2020.2_1118_1232.tar.gz
cd Xilinx_Vivado_Lab_Lin_2020.2_1118_1232/
Once the file is uncompressed, we have to navigate to the folder created and execute the xsetup file with the next arguments.
–agree XilinxEULA,3rdPartyEULA,WebTalkTerm: We accept the End User license Agreements and the terms of the software installed. –batch Install: We will perform an installation. –edition “Vivado Lab Edition (Standalone): We are going to install the tool Vivado Lab Edition. –location ‘/tools/Xilinx’: Location where the files will be installed.
With this arguments, the software will start the installation.
~/Xilinx_Vivado_Lab_Lin_2020.2_1118_1232$ sudo ./xsetup --agree XilinxEULA,3rdPartyEULA,WebTalkTerms --batch Install --edition "Vivado Lab Edition (Standalone)" --location "/tools/Xilinx"
Running in batch mode...
Copyright (c) 1986-2021 Xilinx, Inc.  All rights reserved.

INFO : Log file location - /root/.Xilinx/xinstall/xinstall_1636139063357.log
INFO : Installing Edition: Vivado Lab Edition (Standalone)
INFO : Installation directory is /tools/Xilinx

Installing files, 99% completed. (Done)
It took 1 minute to install files.

INFO : Log file is copied to : /tools/Xilinx/.xinstall/Vivado_Lab_2020.2/xinstall.log
INFO : Installation completed successfully.
One minute later, the software will be installed, and the next is add the path to the PATH variable. We can do that editing the file environment adding to the PATH variable the installation path of Vivado Lab.
/tools/Xilinx/Vivado_Lab/2020.2$ sudo nano /etc/environment
[sudo] password for pablo:
/tools/Xilinx/Vivado_Lab/2020.2$ exit
Now we need to install the cable drivers by executing the script /install_drivers in the installation dir of Vivado Lab.
/tools/Xilinx/Vivado_Lab/2020.2/data/xicom/cable_drivers/lin64/install_script/install_drivers$ sudo ./install_drivers
[sudo] password for pablo:
INFO: Installing cable drivers.
INFO: Script name = ./install_drivers
INFO: HostName = mark1
INFO: Current working dir = /tools/Xilinx/Vivado_Lab/2020.2/data/xicom/cable_drivers/lin64/install_script/install_drivers
INFO: Kernel version = 5.11.0-37-generic.
INFO: Arch = x86_64.
Successfully installed Digilent Cable Drivers
--File /etc/udev/rules.d/52-xilinx-ftdi-usb.rules does not exist.
--File version of /etc/udev/rules.d/52-xilinx-ftdi-usb.rules = 0000.
--Updating rules file.
--File /etc/udev/rules.d/52-xilinx-pcusb.rules does not exist.
--File version of /etc/udev/rules.d/52-xilinx-pcusb.rules = 0000.
--Updating rules file.

INFO: Digilent Return code = 0
INFO: Xilinx Return code = 0
INFO: Xilinx FTDI Return code = 0
INFO: Return code = 0
INFO: Driver installation successful.
CRITICAL WARNING: Cable(s) on the system must be unplugged then plugged back in order for the driver scripts to update the cables.
With all these steps done, our remote host is ready to accept connections. We only need to close and re open the Linux session in order to update the environment variables, and start the Hardware Server.
~$ hw_server

****** Xilinx hw_server v2020.2
  **** Build date : Nov 18 2020 at 09:50:49
    ** Copyright 1986-2020 Xilinx, Inc. All Rights Reserved.

INFO: hw_server application started
INFO: Use Ctrl-C to exit hw_server application

INFO: To connect to this hw_server instance use url: TCP:mark1:3121
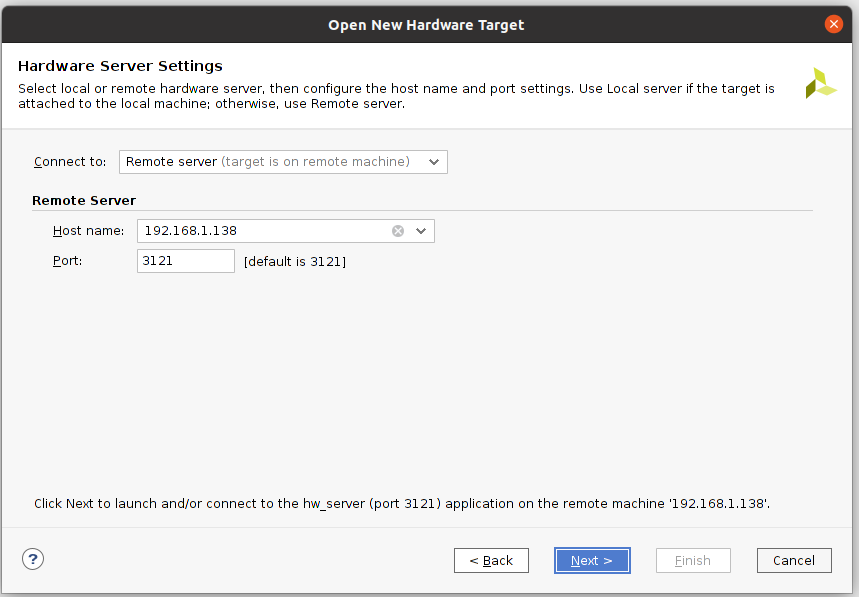
Now, from out working PC, we can open Vivado and open the hardware manager. Now click on Open target > Open New Target. In the Output Target Wizard, we have to Connect to: remote server, and enter the IP of the remote computer. The port will remain as default.
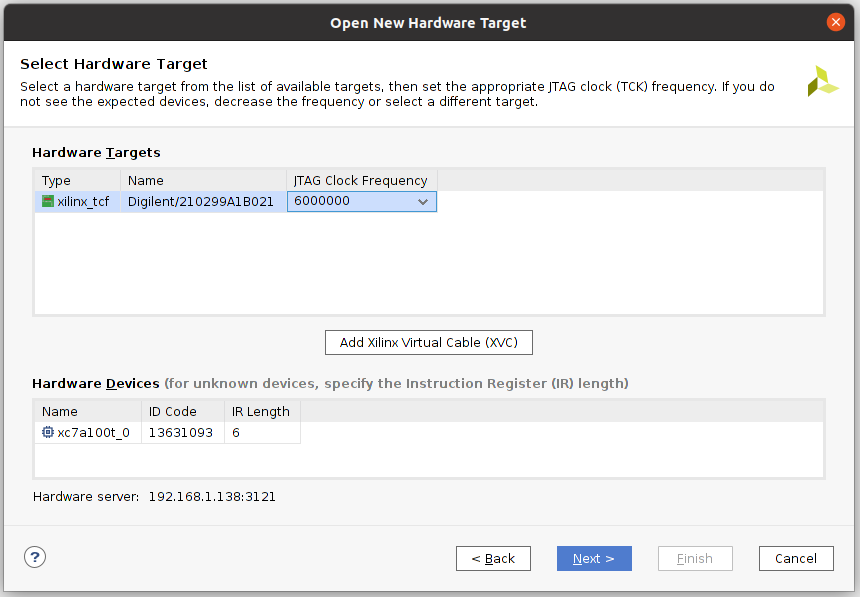
Now by clicking over Next, Vivado will connect with the remote server and will show us the Hardware Targets and the Hardware Devices connected.
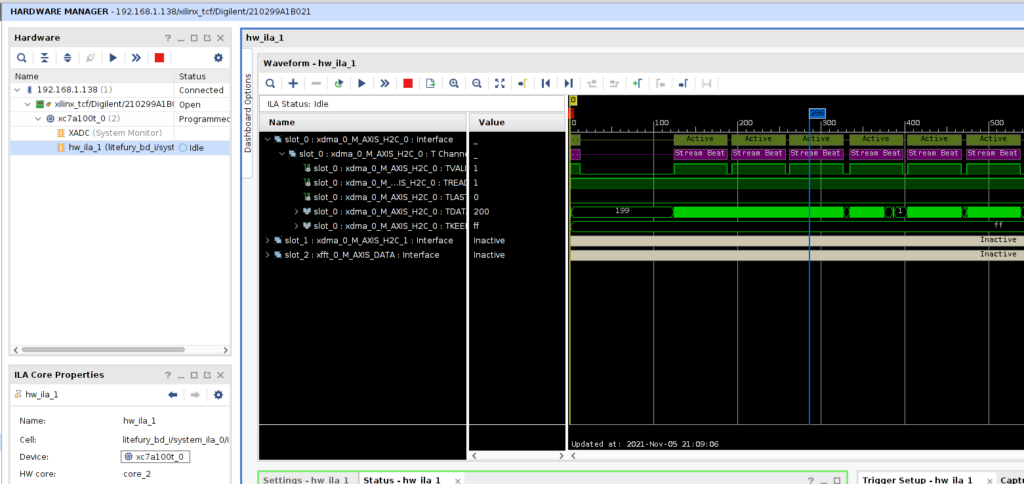
At this point we can debug our design as if the FPGA were connected to our local host.
All of this is not only valid for the example explained at the begining of this post, in my case, in home I have a powerful computer where I work, and also I have a computer for test where some FPGA boards are connected via PCI, and usually I have to debug the design from my working computer, in this case I have installed the hardware server in the computer where I have connected the boards. The are many cases where the working computer and the testing computer are not the same. In all of this cases remote debugging is a useful tool.
In other cases, we might have the FPGA board connected to the host computer, but without access to the board’s JTAG pins. In this case we will need to use the Xilinx virtual cable. This will be discussed in a future post.


