Connecting an SSD to Zynq MPSOC.
 TE0802
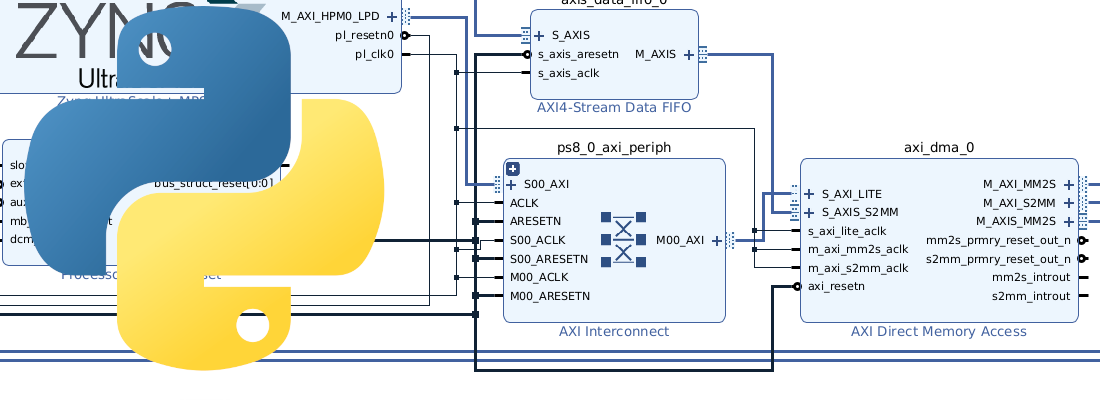
Devices like Xilinx Zynq or Microchip PolarFire give us the possibility to mix in a single design a high-level OS like Linux and a fast device like FPGA. For signal processing, or even data science, is very interesting to acquire an event at rates of several tens of mega samples per second, and then, hundreds of microseconds later, all this data is available on the DDR to be processed from python or C++ algorithm. This kind of devices allow us to perform processing at the edge. The APU inside these devices is limited in terms of power consumption, which is related to the processing power, but in most cases will be enough. On the other hand, in cases where high-performance processing is needed, these devices allow us to preprocess data to improve the transmission to powerful servers. In both cases, we will need to store data on the same board that data is acquired, and the speed of the interface used to transfer data from DDR to the nonvolatile memory will determine the speed what which we will be ready to acquire the next event.
Zynq devices have a lot of interfaces, including gigabit interfaces on the ports GTX, GTH or GTR. These ports can act as Sata interface, USB3.0, PCIe, and is the last one that we will use to communicate an NVME SSD hard disk.
Before starting with the design, we have to take care of the SSD we will connect. In this case, I will use the Trenz TE0802 board, which has an M.2 connector. For this connector, we can find SSD with SATA interface and PCI Express interface. In this case, I will use a PCI Express SSD.

On the Zynq configuration, we have to configure as PCIe interface the GT Lane0 on this board. If you are using a different board, you have to verify which lane is used. Also, M.2 connectors can manage up to 4 Gigabit lanes, and we only will use one, so the speed of both read and writing will be decreased by at least by 4.

Once we have the configuration done, we have to verify the design, generate the bitstream and export the hardware to use it in Petalinux build.
Once we have the hardware exported, we can build out Petalinux distribution. To enable the packages corresponding with the management of NVME SSD, we have to modify first the kernel, to do that we have to execute the next command
petalinux-config -c kernel
After a while, a menu will be opened. At that point we have to navigate to Device Drivers > NVME Support and select the options NVM Express block device and NVME Target Support.

With the kernel module enabled, we will configure the rootfs.
petalinux-config -c rootfs
Now, on the menu, ensure that pciutils is selected. Filesystem packages > console > utils > pciutils

Now, add fsdisk, blkid and util-linux on Filesystem packages > base > util-linux

Then exit and save.
Finally, we can build and package Petalinux, and, using an SD card, run the board.
Next step is to ensure that the SSD is detected by Petalinux by executing the next command
fdisk -l
On the bottom of all DDR modules, we will find the disk.

In my case, the disk has one created partition, but in the case of the new disk, we have to create the partition. To do that we will check if the SSD has been detected as a block device.
lspci
Then, with the name that appears, we have to create a partition.
fdisk /dev/nvme0n1p1
Type n to create a new partition, then type p, then 1 to create a new primary partition, and the rest will remain as default. Finally, type w to write the configuration to the disk. Now, when we execute again lspci, we can see the SSD and the partition created.
Performance test.
Last we will perform a speed test on our device using the dd command. To perform a writing test, the command we have to execute is the next.
time dd if=/dev/urandom of=/dev/nvme0n1p1 bs=2M count=1000
and to execute the read test
time dd if=/dev/nvme0n1p1 of=/dev/null bs=2M count=1000
These commands will return the time spent in the write operation and read operation.

Regarding write operation, the board has spent 32.698 seconds to move 2MB 1000 times, so the speed can be calculated as 1000*2MB/32.698s = 61MB/s**
Read operation will spent 9.319 on the same operation so the speed can be calculated as 1000*2M/9.319 = 216MB/s
If we compare these numbers, with the datasheet numbers of the Corsair MP510 (3000MB/s read, 2400MB write), maybe they can be disappointing, but, the SSD will achieve maximum performance using its 4 lanes. Also, the test I did is done on Petalinux, so the speed will depend on how the operating system manages the read and write operations.
There are several ways to improve these results, but we are limited by the board in some cases, and by the device in others. If we want to keep the device, XZU2EG in this case, we will notice that this device has a total of 4 GT lanes, but these lanes are shared with USB 3.0, Display port and Gigabit Ethernet. If we don’t need this others Gigabit peripherals, we can dedicate all GT Lanes to the M.2 connector, and increase by four the performance of the SSD.
The other way to improve the performance is using Gigabit transceivers instead of the PL instead. Xilinx 7 series families have different kinds of Gigabit interfaces according to their speed, and the device to what they are connected. In this case, the transceivers that this part has been connected to the PS, so the management is completely done by the operating system, which is a bottleneck in terms of performance. If we take a look at the Zynq UltraScale+ product table, we will notice that devices from ZU4xx have on PL, GTH and GTY transceivers, that achieve speeds up to 32 Gbps. Not only Zynq MPSOC has gigabit transceivers, but if we take a look at Zynq SOC product table, we can see that XC7Z012 or XC7Z015 has 4 GTP transceivers with a bandwidth of up to 6.25 Gbps. In the case of using the PL as an interface with the SSD, we have to know that gigabit transceivers implement only the physical interface, and we will need an IP to implement the protocol.